Creating an Overdue Task Alert in SugarCRM
The advanced workflow tool in SugarCRM known as Process Author enables admins to automate processes within organizations. This is the first blog post in our series: Creating Workflows in CRM.
Step 1: Create Email Template
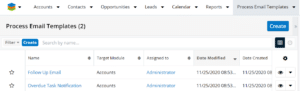
Before setting foot in Process Author, create the email you want to be sent out to users when a task is overdue. Consider what you want the email to say, how you want it to look, and what information from your CRM should be included. First, navigate to the Process Email Templates module. Once there, you will view a list of existing email templates in a list view, like below.
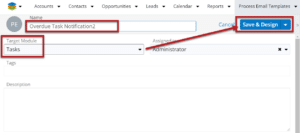
Next, click on “Create” to begin building a new email template. A drawer will open so you can enter the name, target module, and assigned to the user. Name the template “Overdue Task Notification” or another descriptive name, and change the Target Module to “Tasks”. Once you’ve completed these fields, click “Save” to begin drafting the email template.
Once you click “Save”, you will see an empty email template, like in the screenshot below.
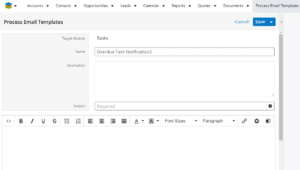
Fill in the subject line and the email content. If you want to add in any dynamic CRM fields, click the gear button on either the subject line field or in the toolbar on the email content field.
Set the Field Value Type next to the fields you want to include in the email template to “Current Value”. Common fields to include would be subject, due date, assigned to, status, and created date. These dynamic fields help the rep know what Task is overdue and it’s urgency.

Once you click the blue “Done” button the fields will be inserted into the email body. When you are satisfied with your email template, click the blue “Save” button. Now your template should be ready to use in a workflow.
Step 2: Create a Process Definition
To begin creating a new workflow, navigate to the module called Process Definitions.
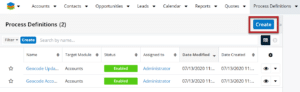 Click the blue “Create” button to begin the process. A drawer will open up where you can add in basic information about the workflow.
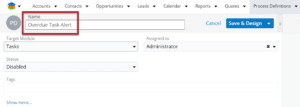
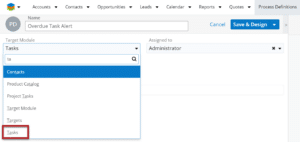
First, choose the target module. The target module is the type of record you want to trigger the workflow. In this case, choose your target module to be Tasks. Note, you can’t have a process definition that triggers from multiple modules–you would have to create separate workflows.
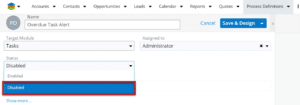
Next, make sure the workflow is disabled. This prevents the workflow from triggering before you are done building it.
Click “Save & Design”. Now you will see a blank design canvas.
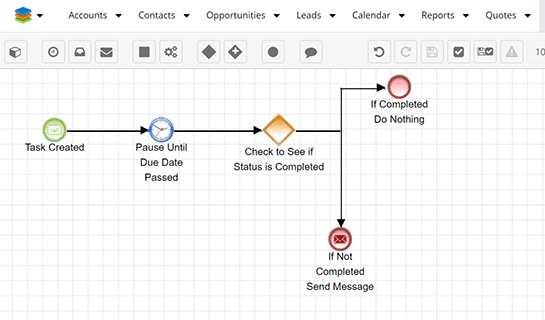
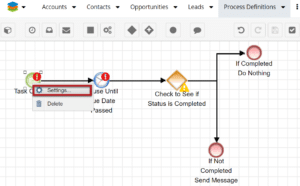
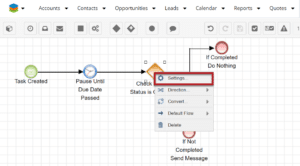
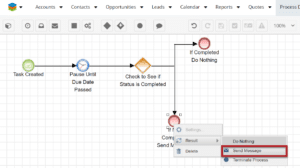
You will need to add five elements to the design canvas to build this workflow. Simply click on the event symbols in the toolbar and drag them to the design canvas. The buttons you will need to use are framed in the color red below.

Add one start event, one wait event, one exclusive gateway, and two end events.
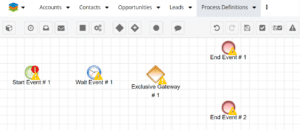
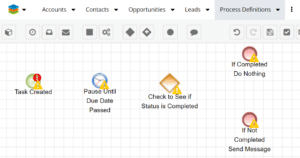
Now you should rename each event in a descriptive way to help you understand what each event does. The names in the image below are good examples.
Once you have the five events added and renamed, you can begin connecting them using the crosshairs. Hover over the event until you see the crosshairs, then click and drag to connect two events.
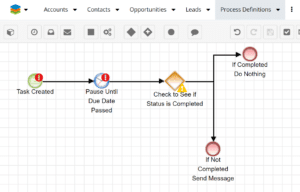
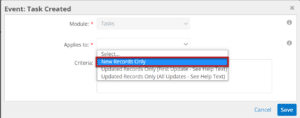
Once all five events are connected, right-click on each event and adjust the settings. You may not need to always adjust settings on all of them, but it is best practice to check each of them. This is where you will set criteria for the workflow to run and the specific actions that will be triggered. Right-click on the start event and select “Settings”.
A pop-up window will open. Under the “Applies to” drop-down, select the option for “New Records Only” since we want every Task record created to be monitored. Click “Save”.
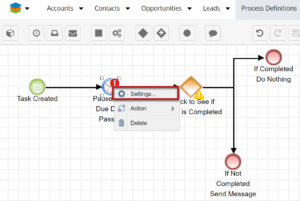
Next, right-click on the wait event.
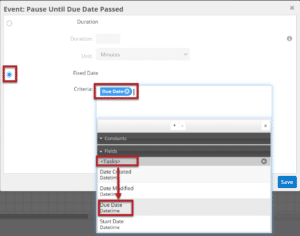
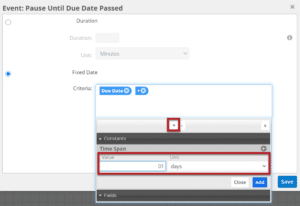
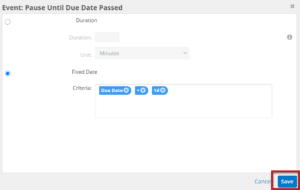
This is where you will tell the workflow how long to wait before checking to see if the Task has been completed. We want the workflow to check for Task completed one day after the due date (this provides a little cushion). Select the radio button for “Fixed Date” and then set the criteria to be “Due Date” plus one day. To do this, select “Due Date” under fields, a plus sign, and one day under “Constants”.
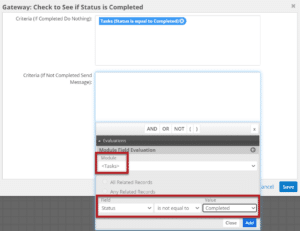
Next, right-click on the gateway event and click “Settings”. Here we must set what criteria determine which path the workflow takes.
Set the first gateway criteria by clicking “Evaluation”, then choosing “” from the dropdown, and then selecting the criteria to be “Status is equal to Completed”. Click “Add”.
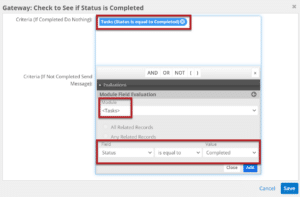
Set the second gateway criteria by clicking “Evaluation”, then choosing “” from the drop-down, and then selecting the criteria to be “Status is not equal to Completed”. Click “Add”. Then click “Save”.
Now we must adjust the settings on the two end events. Right-click on the top end event and verify that the result is set to “Do Nothing”.

Right-click on the bottom end event and change the result from “Do Nothing” to “Send Message”.
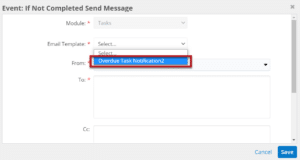
Right-click on the end event again and go to “Settings”. From here, select the email template we created in step one.
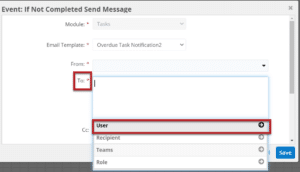
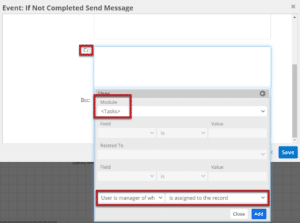
Next, indicate who you want the alert email to be sent to in the “To” field. If you have one person who is responsible for Tasks, you could just type in their email address. Usually, you will want to alert the person it is assigned to. To do this, select “User” and then click the bottom right drop-down to select “is assigned to the record”.
You may want to send the alert to the assigned user, the user’s manager, or both. To also CC the manager, Select “” and “User is a manager of who is assigned to record”.
Click “Save”. Now you are done building the process definition.
Step 3: Activate & Test
The last step is to go back to the list view of Process Definitions and edit the definition we just created. Change the workflow to be active/enabled. After it’s active, test your workflow to see if it works. If it doesn’t, walk through these steps again and make sure you did everything right.