Contents
- 1 How to verify an email address: Table of contents
- 2 What is email verification?
- 3 Why does email verification matter for cold email outreach?
- 4 When to verify an email list?
- 5 How to verify email addresses before sending?
- 6 What is the best method for verifying emails?
- 7 Why choose Saleshandy for email list verification and cold email outreach?
- 8 Final Thoughts
So, you are tired of pouring your efforts into building an email list, and crafting compelling emails, only to find out that they never reach your prospects.
Don’t worry; you’re not alone. Many sales professionals like you face similar problems while performing their cold email outreach. We understand the frustration of having emails getting bounced back and never reaching the intended recipients.
The common culprit behind this issue is often an unverified email list.
Fear not because, in this article, we have the solution you’ve been searching for. We’ll explore effective ways to verify your email list, ensuring that your messages reach the right people and maximize the chances of your success.
But before that, let us first understand what email list verification actually is and why it is so important for your sales outreach.
How to verify an email address: Table of contents
- What is email verification?
- Why does email list verification matter?
- When to verify an email list?
- How to verify email addresses?
- Which is the best method to verify email addresses?
What is email verification?
Verifying an email list is an important step in cold email outreach. It is a process of checking and authenticating wrong/invalid emails that are on the list.
The purpose of email verification is two-fold:
1) It aims to ensure the validity of the email addresses.
2) It increases the likelihood of connecting with legitimate email accounts.
As a result, you are able to move forward with your cold-email campaign more securely by filtering out spammy and invalid email addresses.
Now that we have a basic overview of email list verification, let’s see why it’s a necessary step in your outreach process.
Why does email verification matter for cold email outreach?
To send cold emails, the first step is to gather the emails of the intended recipients. However, many professionals skip this step of verifying the email list and directly jump on to the outreach.
Here are some reasons why you should verify your email list before sending cold emails:
1) Helps you avoid email bounce rates
The horror of email bounces in a cold email campaign is real. They can damage your email account’s credibility and impact your domain reputation. In the worst-case scenario, you might even find yourself on the dreaded spam list, blocked by email service providers (ESPs).
But when you verify your email list before sending those cold emails, you can filter the good contacts from the bad ones. And the result? A significant decrease in your email bounce rate and a safe distance from those menacing spam indexes.
2) Ensures email reputation and deliverability
Your email account has a reputation to uphold. The sender reputation score determines how reliable and trustworthy you are as a sender. The better your reputation score, the smoother your emails sail into your prospect’s inboxes.
But, if you are constantly sending emails to invalid or spam-filled accounts, you’re playing with fire. Your email account could get suspended very quickly, even before you realize it. Not a situation you want to be in!
Verifying your email list is a nifty process that ensures that your emails reach the right folks in an authentic manner, boosting your account’s email deliverability and reputation score.
3) The email list gets refined
Sending emails to invalid or inactive addresses results in high bounce rates and wasted effort. Your valuable messages go undelivered, and your sender reputation takes a hit. Moreover, repeatedly sending emails to unengaged recipients increases the risk of being marked as spam, ultimately damaging your email deliverability.
Email verification weeds out inactive or non-existent addresses, ensuring that your outreach efforts reach the right people. With that, you now have an email list that is clean, refined, and devoid of any inaccurate email addresses.
This saves you from wasting resources on sending emails to contacts that will never receive them, helping you focus your outreach efforts on prospects who are likely to engage.
4) Minimizes spam complaints
When you send emails to unverified email addresses, it’s like stepping into a minefield of potential spam complaints. Your well-crafted emails may never reach the intended recipients, hampering the effectiveness of your cold outreach campaigns.
You don’t want to go down that road. By running your email list through the verification process, you can identify and remove risky or inactive accounts. This means you’re only sending emails to engaged, interested recipients who actually want to hear from you.
5) Helps you get better at your outreach efforts
Imagine this: Putting in hours of effort crafting the perfect email campaign, only to receive lackluster responses or, worse, no response at all.
It’s frustrating, right? You need a way to ensure that your messages reach the right people who are genuinely interested in what you have to offer.
With a verified email list, your outreach efforts become more effective and efficient. You can connect with engaged individuals who are more likely to open, read, and respond to your emails. This means better conversion rates, increased engagement, and ultimately better results from your outreach campaigns.
You are now aware of why email verification is an integral part of cold email outreach. The next question you might ask is, “when” and “how often” should I verify email addresses?
While there is not such a strict rule, there are definitely some ideal moments when it’s highly recommended to verify your emails. Let’s discuss those opportune times.
When to verify an email list?
Making sure every email address on your list is legitimate and real is super important. A lot of professionals ignore/skip this crucial step of verifying email lists, the result being higher bounces and, in extreme cases, accounts getting suspended.
Here are the three instances when you should definitely verify your email addresses:
1) You have got a new email list
When planning to launch a new cold email campaign using an entirely new list, it’s highly recommended that you authenticate it beforehand.
A new list, especially one with a vast amount of data, may include erroneous, spam-like, or invalid contact details. This could have a detrimental effect on your outreach success.
This ensures that right from the start, your list is clean, valid, and ready for action.
By validating the list, you can proceed with emailing confidently.
2) There is a constant increase in your email bounce rate
If you notice a steady rise in your bounce rate, it’s a red flag that something’s amiss.
Don’t ignore it! It is time to take a closer look.
A high number of bouncebacks can actually harm your email account, and that’s something we want to avoid. To prevent any negative consequences, it’s crucial to reassess your email contacts and get rid of any invalid ones.
By verifying the email addresses on your list, you ensure that you’re only targeting active and reachable recipients. It’s a proactive step to identify and remove any invalid or non-existent addresses.
This will help you regain control over your bounce rate and ensure better deliverability.
3) It’s been a while since your last periodic email list checking
According to research, an email list degrades by around 22.5% in a year. So it’s always a good idea to make email list verification a regular part of your outreach routine. It is recommended to conduct email list verification every three months or at least twice a year.
When someone leaves a company or closes their email account, it can mess up your contact lists. That’s where frequent email verification helps. By regularly checking and removing invalid addresses from your outdated lists, you’re actually doing yourself a favor.
Not only does this practice help preserve your sender’s credibility, but it also ensures that your outreach efforts consistently bring in positive results. So, make it a habit to validate those email addresses regularly and keep your campaigns on track!
Now that you know when to verify email lists, the next step is to ensure that your email addresses are correct for which there are various methods. Let’s get into each one of them.
How to verify email addresses before sending?
When you have a list of your prospects’ email addresses, the next step is to verify that they are active and genuine.
Verifying email addresses typically involves checking if an email address is valid and active. There are 7 ways through which you can verify email addresses:
- Verifying email addresses in an outreach tool
- Checking the email syntax
- Sending emails from different accounts to verify
- Pinging the server
- DNS lookup
- IP address lookup
- Using an email verification tool
Let’s take a look at each of them.
1) Verifying email addresses in an outreach tool
Cold email outreach tools should offer more than just cold emailing. Consider choosing an email outreach tool that includes email verification as a feature. This way, you can simplify the process by verifying your emails directly within the tool itself.
It’s a convenient and versatile method to ensure your email list remains clean and contains valid addresses without the need to know technicalities or waste time and money on separate tools.
And as we talked about versatility, Saleshandy is an excellent choice as a cold emailing tool. Why? Because it not only optimizes your outreach efforts, but it also verifies the email list as soon as you upload it in Saleshandy, ensuring your emails reach the right prospects.
Here’s how you can utilize Saleshandy to verify your email list before proceeding with your outreach efforts:
Step 1: Sign up with Saleshandy
To get started, sign up for an account. It will hardly take you a minute to fill the required information and getting started.

Step 2: Create Sequence
After signing up, you will be directed to the Saleshandy dashboard. On the right hand side of the dashboard (in the sequences option), you will see the Create Sequence button.
Click on it to begin the sequence creation process.

Step 3: Click on Add step
Within the sequence creation interface, you will find settings for configuring your email sequence.
To add a step or an action within the sequence, click on the Add step button. This allows you to craft your first email in the sequence. And once you are done with that hit “Save”.

Step 4: Upload your prospects’ list
As you craft your first email, within the prospect’s tab you can add your email list via a CSV (Comma Separated Values) file.

Step 5: Verify email addresses
After uploading your prospects’ list, Saleshandy will provide you with an option for email verification.
This feature ensures that the email addresses in your list are valid and active as it’s necessary for any cold email outreach campaign.

Once the email verification process is complete, Saleshandy will send you an email with the list neatly segregated into three categories: Valid, Bad, and Risky.
- Valid email addresses are those confirmed to be active and deliverable.
- Bad email addresses are those that are invalid or nonexistent,
- Risky ones are those with uncertain deliverability.
This categorization helps you identify and prioritize your prospects effectively.

By using Saleshandy’s email verification feature, you can ensure that your emails reach real and active recipients, improving the overall success of your campaign.
In case you do like to explore other methods to verify your email list, we have listed them below.
Disclaimer: They are not that simple and easy compared to going for a cold email outreach tool with email verification as a feature.
Anyway, let’s check out the other tedious ways through which you can verify your email list.
2) Checking the email syntax
Typographical and syntax errors are the most common issues you’ll encounter with email addresses. You have to manually review and correct them.
A typical email address consists of three parts: a unique identifier, the “@” symbol, and a domain name.
To better understand syntax errors, here is an example-
Let’s consider the address “abc@def.com.”
In this case, “abc” represents the email’s unique identifier. It must not exceed 64 characters and can include uppercase and lowercase English letters, digits from 0 to 9, and special characters like “! # $ & % ‘ * + – / = ? ^ _ ` | {.”
The “@def” portion refers to the domain name, which could be something like “@gmail.com” or “@saleshandy.com.”
Also, check whether or not an email address adheres to the syntax mentioned above; otherwise, the emails will be returned or “bounce back.” Additionally, be cautious of typographical mistakes such as “@gmol.com” instead of “@gmail.com,” as they can also cause emails to bounce back.
3) Sending emails from a different account to verify
If you want to check if an email can be delivered to someone, it’s common to send them an email. But here’s the thing, doing that from your main email account can be risky. So, it is better to create a secondary email address and use that to test sending emails to your recipients.
If you’re looking to clean up your email list and remove bounced accounts, you can do it manually. However, it can be quite a hassle because you’ll need to go through the entire process twice. This means double the work and extra time spent on managing your list.
4) Pinging the server
If you don’t want to send any test emails, another way of verifying email addresses is ‘pinging the server.’ This approach helps confirm the validity of an email address.
To perform this check, you’ll need a tool like PuTTY for Telnet if you’re using a Windows system. If you are a Mac user, you can use the iTerm app.
Here are the steps to follow for pinging the email server:
Step 1: Enable Telnet on your Windows system.
Step 2: Open the command prompt and type the following nslookup command: nslookup –type=mx domain.com. This will provide you with multiple MX records associated with the domain.
Step 3: Choose the one with the lowest preference number.
Connect to the Telnet server using the command: telnet {mail server address} 25.
Step 4: Perform a handshake with the server by typing: HELO
Step 5: Provide your identity using a random email address with the command: mail from: {random email address}.
Step 6: Next, add the email address you want to verify using: rcpt to: {email address to verify}.
The server will respond with either an “OK” message or an error message. If the response is “OK,” then the email address is valid.

Note: This method of email verification produces accurate results. However, it may have a negative impact on your system.
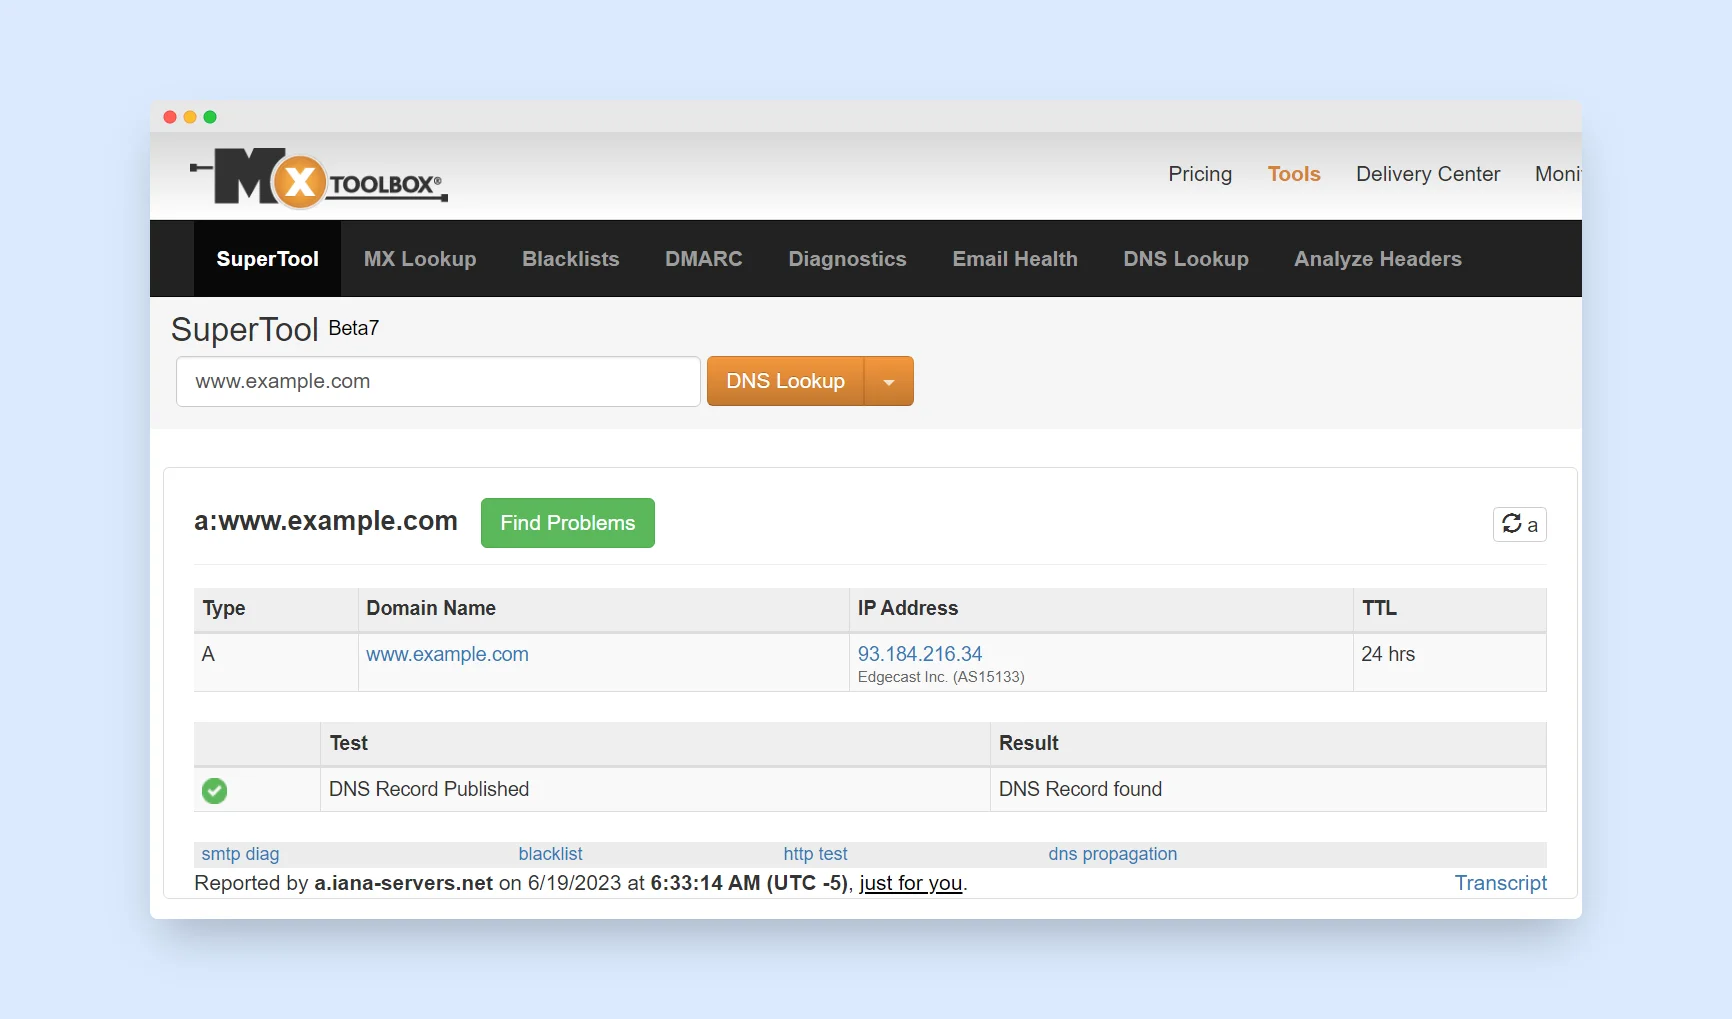
5) DNS lookup
When you want to find out which email server accepts emails for a specific domain name, you can use a process called DNS lookup. It’s like asking a DNS server for information, particularly the MX record that tells you the email server associated with the domain.
To perform a DNS lookup, you can follow these steps:
Step 1: Open the MXToolbox DNS Check in your browser.
Step 2: Enter the recipient’s domain name in the designated text box.
Step 3: Click on the DNS check button. You will receive a list of hostnames and their corresponding DNS record details.

If you don’t see any details for the provided domain, it is likely that the domain is not available or doesn’t have any existing DNS records.
(Like in the image given below you can see it didn’t show up any records, so its likely that domain doesn’t exist)

Note: The system of conducting a DNS lookup may not be completely reliable due to cached data, DNS propagation delays, and potential misconfigurations of DNS records. This, in turn, can affect email deliverability.
6) Performing an IP address lookup
When verifying emails via IP address check, aim to ensure the email address is linked to a valid, registered, and functioning domain. This is important because domains can expire, or companies may switch to new domains, resulting in new email addresses.
During this process, the verification service examines the DNS records of the domain name and checks the MX records specifically. This helps confirm that the domain is capable of receiving emails effectively.
Here is how you can do it:
Step 1: Start by opening MXToolbox in your browser.
Step 2: Enter your fully qualified domain name in the provided text box and click on DNS Lookup.
Step 3: You’ll receive a list of IP addresses associated with the domain.
You can choose any one of the list of IP addresses.
In the next step, we will start with the IP address lookup. You can find many IP address lookup tools like whatismyipaddress over the internet that can provide the IP details of the recipient’s email server.
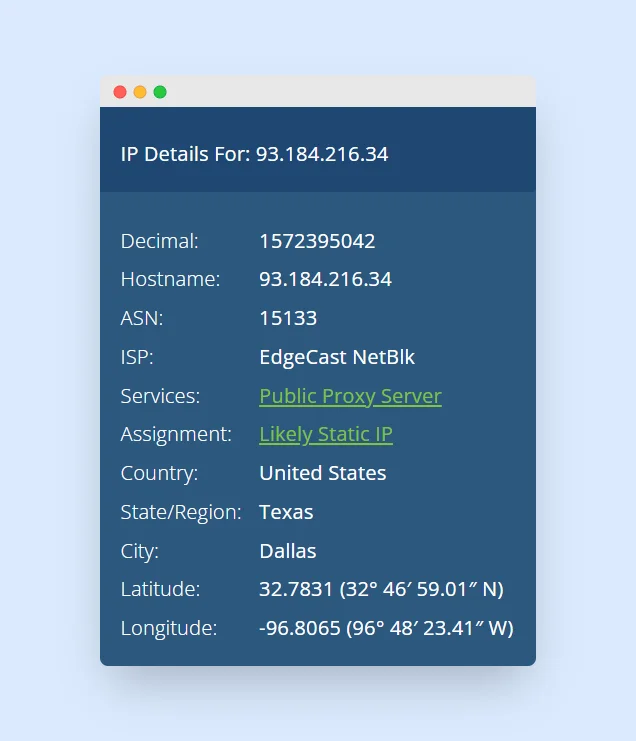
Once you have the lookup results, take a look at the location servers and ISP details provided. This information can give you valuable insights. If you come across anything unusual or suspicious, it could indicate email spoofing and that particular email address may be risky.
An email validation tool can help you do all the technical verifications in one click.
7) Using an email verification tool
An email verification tool simplifies the process of validating email addresses, ensuring that your email lists are reliable and contain high-quality addresses.
There are many email verification tools in the market. One such tool you can use is Saleshandy Connect. Uploading your email list to the tool takes care of verifying each email address, saving you time and effort. With this tool, you can trust that your email campaigns will reach the right recipients and yield better results.
Ok, so now you are aware of the various ways through which you can verify your email list. But the problem is a majority of the methods listed above are hard and time consuming. Though an email verification tool can help here, that again adds to your monthly recurring expenses.
So, how do you choose the right method to verify your lead list?
Don’t worry! We have made things simple for you. In the very next section, we have covered which method is the best for your email list verification.
Let’s dive in!
What is the best method for verifying emails?
If you’re looking for a reliable and efficient way to verify your email list, there are three factors you must consider:
1) Time-efficiency
Checking email syntax and sending emails from different accounts may seem like simple tasks, but they can actually be quite time-consuming and demand a lot of manual work. All that time and effort you spend on doing these things could be better utilized for your other important outreach tasks.
2) Complexity
Pinging servers and performing DNS and IP address lookups – are technical tasks that require a certain level of understanding. Let’s be honest, a salesperson should be focused on building relationships and closing deals, not getting tangled up in technical tasks.
3) Cost-efficiency
Investing in an email verification tool is an additional expense, especially if you’re already using an email outreach tool. It can feel like an unnecessary add-on that weighs heavily on your pocket. Not only that but switching between the two different tasks can be hectic (for real!).
So, considering a cold email outreach tool that offers email verification as a feature is the best option to go for.
It’s like hitting two birds with one arrow-
1) Saving time on email verification
2) Scaling the outreach campaign with a suite of other helpful features.
Ok, so you are convinced that choosing a cold emailing tool that also offers email list verification is the optimal way out. But the next question that you might have is, “Is there any such tool like that?”
How about we make this easy? Here’s where Saleshandy comes into the picture.
Let’s see how. 👇
Why choose Saleshandy for email list verification and cold email outreach?
When it comes to cold outreach, Saleshandy is the go-to tool that ticks all the boxes. By using Saleshandy, you can focus on what matters most – building relationships and closing deals – without worrying about the technicalities of email verification and outreach.
Here’s why you should choose Saleshandy for your cold email outreach:
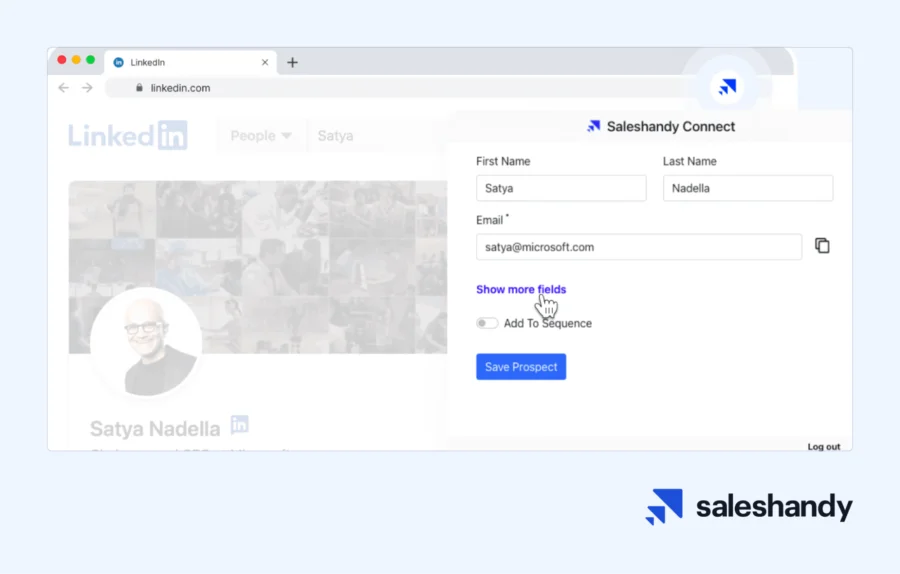
1) Saleshandy Connect: Saleshandy Connect is a Chrome extension that finds accurate and up-to-date email addresses for your prospects from LinkedIn. It simplifies the lead generation process by providing you with reliable contact information, allowing you to connect with your prospects effortlessly.
2) Email list verification: Saleshandy’s email list verification feature verifies the authenticity of each email address in your list. It then sends you an email with the list bifurcated into three categories: Valid, Bad, and Risky. This ensures you send cold emails to valid email addresses.

3) Email personalization: With powerful features like merge tags and spin tax, the tool enhances email personalization. Spintax creates multiple variations of your email content, adding a touch of uniqueness to each message. Merge tags allow you to dynamically insert recipient-specific information, such as their name or company, making each email feel tailored and relevant to the individual recipient.

4) Scheduling and automated follow-ups: Saleshandy’s automation features simplify your email management. You can schedule emails to be sent at optimal times, automate follow-ups based on recipient behavior, or at set intervals. This saves you time, enhances efficiency, and ensures consistent and timely communication with your contacts.

5) Cost-effective and scalable: Saleshandy offers cost-effective plans tailored to your business needs. Whether you’re a small startup or a large enterprise, Saleshandy provides flexible pricing options that allow you to scale up as your business grows.
Final Thoughts
In conclusion, email list verification is crucial if you aim to maintain a clean and relevant lead list for your outreach. By ensuring the accuracy and quality of email addresses, you can improve the deliverability rates, enhance customer relationships, and maximize the effectiveness of your cold emailing campaigns.
If your cold email outreach tool doesn’t support email list verification and you have to spend for a verification tool separately, then Saleshandy gets the job done for you, saving you time and money at no extra cost. Start your 7-day FREE Trial now!